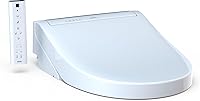
How to Install a Bio Bidet Seat
To install a Bio Bidet seat, shut off the water and drain the tank, remove the old seat, and fit the mounting plate onto the bowl. Then connect a T-valve to the tank inlet, run the bidet hose to the seat, and check every joint for leaks before you turn the water back on.
On this page (11 sections)
- What tools and parts do you need before you start?
- How do you shut off the water and remove the old seat?
- How do you fit the mounting plate to the bowl?
- Where does the T-valve go on the tank inlet?
- Which T-valve and hose match your toilet?
- How do you connect the bidet hose to the seat?
- Which T-valve suits a TOTO Washlet-style seat?
- How do you check for leaks and finish the install?
- What should you check before you buy a Bio Bidet seat?
- How do you keep the install leak-free over time?
- Which setup should you pick for your install?
To install a Bio Bidet seat, shut off the water and drain the tank, remove the old seat, and fit the mounting plate onto the bowl. Then connect a T-valve to the tank inlet, run the bidet hose to the seat, and check every joint for leaks before you turn the water back on.
The job is a plumbing swap, not a renovation. Most of the work happens at the tank inlet and the two mounting holes.
What tools and parts do you need before you start?
Gather an adjustable wrench, a bucket or towel, and the seat's mounting hardware, plus a T-valve and a supply hose that match your toilet. A screwdriver helps if the old seat uses a slotted bolt.
Bio Bidet seats usually ship with the mounting plate, bolts, and a hose. Check the box first so you aren't mid-install looking for a washer.
- Adjustable wrench or open-end wrenches
- Bucket, sponge, and old towels for the tank drain
- The seat, mounting plate, and hardware from the box
- A T-valve and a braided supply hose
- A flashlight for the space behind the tank
A second person makes lifting and aligning the seat easier, though one person can manage.
How do you shut off the water and remove the old seat?
Close the shut-off valve behind the toilet and flush to empty the tank. Hold the flush handle down or press the valve inside the tank to clear the last of the water, then sponge out what remains.
Close the valve clockwise until it stops. If it's stiff or won't close, stop and call a plumber rather than forcing it.
Unscrew the nuts under the old seat and lift it off the bowl. Clean the rim where the old seat sat so the new plate sits flat.
Our guide to how to remove a bidet toilet seat safely covers stuck bolts.
How do you fit the mounting plate to the bowl?
Set the plate over the mounting holes and hand-tighten the bolts, then slide the seat onto the plate to check the fit. The plate should sit flat with no rock.
Line up the plate's slots with the holes in the bowl. Most Bio Bidet plates allow a little front-to-back adjustment, so center the plate on the bowl's curve.
Drop the bolts through the plate and bowl, then add the washers and nuts underneath. Tighten by hand until snug, then a quarter turn with the wrench.
Over-tightening can crack a ceramic bowl.
How do you know the seat sits straight?
Slide the seat onto the plate and close the lid, then look at the gap along each side of the bowl. Even gaps mean the plate is centered; a wide gap on one side means you need to loosen and shift it.
If the seat rocks, check that the plate isn't sitting on a raised hinge or a chip in the rim. Once it looks straight, lift the seat off and finish tightening the bolts.
Where does the T-valve go on the tank inlet?
The T-valve fits between the toilet tank's fill valve and the supply hose so water can branch to both the tank and the bidet. You unscrew the existing supply line at the tank, thread the T-valve on, and reconnect the line to the valve's side port.
Water comes from the wall through the supply hose, into the T-valve, and then splits: one path fills the tank, the other feeds the bidet. Follow the seat's instructions on thread tape, since most T-valves rely on a cone or tapered washer instead.
Hand-tighten the T-valve onto the tank inlet, then snug it with the wrench. Don't overtighten plastic threads; they strip more easily than brass.
Which T-valve and hose match your toilet?
Match the thread sizes on your supply line and tank inlet, because a mismatched T-valve is the most common reason an install stalls. Standard US toilets usually use a 7/8-inch tank inlet and a 3/8-inch wall connection.
The SOMDARHK adapter uses a 7/8 inch by 7/8 inch by 1/2 inch thread setup. Its 7/8 inch male thread goes to the supply hose and the 7/8 inch female thread attaches to the tank.
The 1/2 inch port feeds the bidet hose.
If your bidet hose is 3/8 inch, SOMDARHK notes you'll need a 1/2 inch by 3/8 inch adapter to make the fit. Its single lever turns 90 degrees to open or close, and its tapered washer is designed to seal better than a flat pad.
How do you connect the bidet hose to the seat?
Thread the bidet hose onto the T-valve's branch port and the seat's inlet, using the washers supplied with the seat. Run the hose in a gentle curve so it doesn't kink behind the bowl.
Start at the T-valve: screw the hose on by hand until it seats, then a small turn with the wrench. Repeat at the seat inlet.
Keep the hose off the floor and away from the tank's moving parts, since a hose that rubs can wear through.
If your supply line is short or stiff, a longer braided connector gives you room. The Fluidmaster B1T12 measures 12 inches and uses a 3/8 inch female compression by 7/8 inch female ballcock thread.
Its stainless braiding is built to resist bursting and leaking under high pressure, and 12 inches suits a standard toilet where the wall valve sits close to the tank.
Which T-valve suits a TOTO Washlet-style seat?
A T-valve made for Washlet inlets fits TOTO A, C, and S series seats without an extra adapter. The Holdly tee replaces the OEM TOTO THU6234 part and uses 7/8 inch threads on both ends.
It attaches to the bottom of the tank and its thumb nut tightens by hand, so you don't need a wrench at that joint. The body is engineering plastic, which resists corrosion but won't take the same torque as brass.
Hand-tighten it and stop if the plastic starts to give.
How do you check for leaks and finish the install?
Turn the water back on slowly and watch every joint for a minute, then flush the toilet and run a bidet cycle. A dry paper towel wiped along each connection shows a weep before it becomes a puddle.
Open the shut-off valve a quarter turn first. Listen for hissing and look for drips at the wall valve, the T-valve, the tank inlet, and the seat hose.
If a joint leaks, shut the water off, take it apart, and reseat the washer. Tighten by hand first, then a quarter turn with the wrench.
More force rarely fixes a leak and often cracks a fitting.
When everything is dry, clip the hose out of the way and test the seat's controls. For more detail on the water side, see how to install an electric bidet toilet seat.
What should you check before you buy a Bio Bidet seat?
Measure your bowl and check the mounting holes first, because fit problems cost more time than the plumbing. Most Bio Bidet seats need a round or elongated bowl with standard bolt spacing.
Check the distance from the mounting holes to the front of the rim and the width across the bowl. Compare those numbers to the seat's fit range before ordering.
Look at the space behind the tank for the T-valve and hose. A tight cabinet or a hidden inlet makes the water side harder, though not impossible.
If you aren't sure your toilet qualifies, our guide to whether your toilet seat is compatible with a bidet walks through the measurements.
How do you keep the install leak-free over time?
Check the joints once a month for the first few months, then twice a year, and tighten only if a washer has worked loose. A slow drip behind the tank often goes unnoticed until the floor shows damage.
Wipe the T-valve and hose connections with a dry tissue during routine cleaning. A damp spot that returns after tightening means the washer needs replacing, not more force.
Keep the bidet hose free of kinks and away from the flush valve.
Which setup should you pick for your install?
Pick the SOMDARHK brass T-valve if you want a shut-off lever and standard 7/8 inch fittings, since the lever lets you cut water to the seat without touching the tank. Choose the Holdly tee if you're fitting a TOTO Washlet-style inlet and want a direct THU6234 replacement.
Add the Fluidmaster connector when your old supply line is short or stiff.
Once the seat is on and the joints are dry, the install is done. Compare features across models in our guide to the best Bio Bidet seats if you haven't bought yet.
Frequently asked questions
Do I need a plumber to install a Bio Bidet seat?
No. Most Bio Bidet seats mount to the existing toilet bowl and connect to the tank supply with a T-valve, so a careful DIYer with a wrench can do it.
Call a plumber if your supply line is corroded, your shut-off valve won't close, or the outlet doesn't reach the toilet.
How long does a Bio Bidet seat installation take?
Plan about 30 to 60 minutes for a standard seat. Most of that time goes to draining the tank, fitting the mounting plate, and checking the new connections for leaks.
A second pair of hands helps when you lift the seat and align the plate.
What if my water supply line doesn't reach the T-valve?
Replace the short or stiff line with a longer braided connector sized to match your fittings. A 3/8-inch compression by 7/8-inch ballcock connector is a common match for a standard toilet.
Measure the run first so the new line curves without kinking.
Can I install a Bio Bidet seat on a one-piece toilet?
Often yes, if the bowl has a flat mounting area and the tank supply is reachable. Check the seat's mounting-hole spacing against your bowl first.
Some one-piece bowls have shaped or hidden inlets that make the T-valve fit awkward.
Why is water leaking after I install the seat?
A leak usually means a washer is missing, seated crooked, or the nut is not tight enough. Shut the water off, take the joint apart, and reseat the cone washer with the wide side against the fitting.
Tighten by hand first, then a quarter turn with a wrench.